Sunday, December 2, 2012

Keep it tight during the holidays!

Hi Pinners!!


I've missed you all, truly. This is my favorite time of year in case you didn't know. The time where you can build a snowman, craft cute holiday ornaments and reefs, cuddle by the fire, eat a million warm gooey cookies....STOP THERE! NO! DO NOT GAIN THAT HOLIDAY WEIGHT! STAY STRONG PINNERS! 

When looking on Pinterest, there are millions of healthy options to cook instead of the classic pounds of butter cookies and pies that would add 5lbs to my thighs with just one bite. 

Here just type in "Healthy Holiday Foods" and screen would look like this!


There are so many tasty little treats that are so easy to make and very healthy for you. Pinterest will show you hundreds.


By far my favorite little holiday treat that I saw on Pinterest are these 80 calories Chocolate Coconut Snowballs!


So enjoy and don't loosen that belt! Keep it tight Pinners! Enjoy the healthier things.


Bye Pinners!

Keep it Spiked ladies ;)

Hi Pinners!

Who loves heels? Better yet, who loves when you can take your old heels and make them look stylish and new again? I know, everybody (sorry men). Spikes are in ladies and they are ALL over Pinterest. Spike Bracelets, Spike Necklaces, Spike bags and my favorite, SPIKE HEELS!! But, heres the downfall...If you go to a store and try to buy these spiked heels, your wallet would shed a tear. So as I was Pinning away one day I saw this DYI Spike Heels and fell in love! Heres the tutorial!

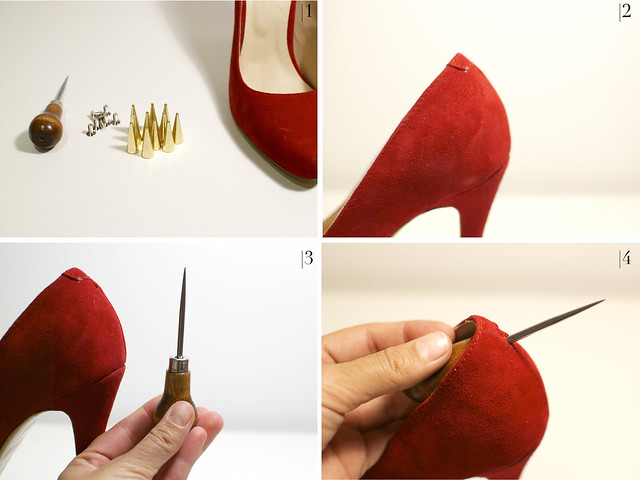
You need
- 6 cone spikes (local craft store)
- A pair of leather/ suede heels
Dart Awl hole making tool (makes life way easier!)
- A screwdriver

How to
1. Look at the seam at the back of your heels and mark with pencil where you want the spikes to sit. You want the spikes to sit apart so that there isn't too much strain on the seam.

2. Using your hole making tool, push through the seam and wiggle to create a hole.

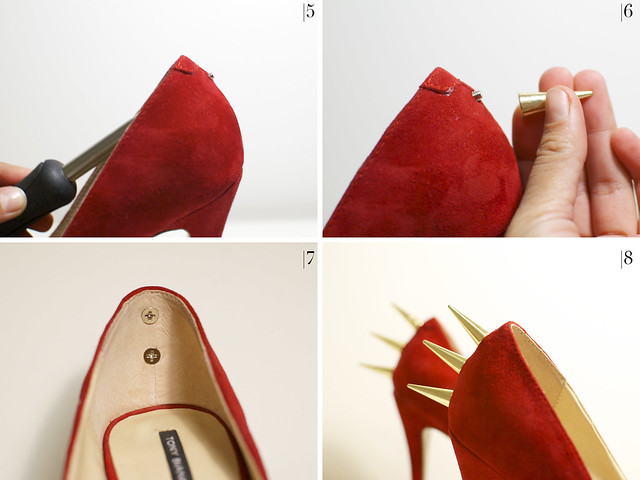
3. Push the screw through the hole, using a screwdriver to twist if it is difficult to get through.

4. Attach your spikes to the screw by twisting.

5. Use the screwdriver to tightly screw the studs on. Make sure the screws are flush with the leather so your the back of your heels don't get irritated.

diyspikeheels 


diyspikeheels2

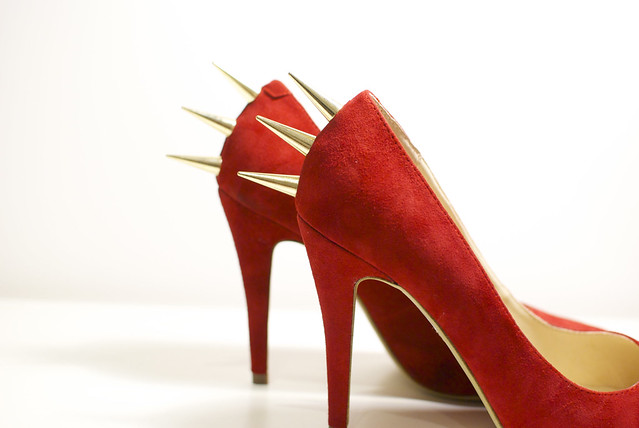
And there you have it. Done. Simple. GORGEOUS.


spikeheels12


Keep it Spiked Ladies ;)

Bye Pinners! 

Snowflakes of Glue...

Hi Pinners!

Its the holiday season, so for all your little crafting needs GET ON PINTEREST! This post is for the non-crafty just throw glitter on glue kind of people. I was looking in the DYI Crafts section on Pinterest and there are millions of fun things to do. Myself being a poor college student can not afford to go out and buy 14 dollar ornaments and reefs just to decorate so I rather use things I already have and well, make things glittery! 

I saw this great idea for ornament decorations and it was just a simple ornament made out of hot glue! Now if your like me, hot glue is probably the one thing you hate to use when crafting (it gets all sticky and messy and I burn my fingers), but for this one simple craft, it really wasn't that bad. 

Supplies You Will Need:
  • Glue Sticks

  • Hot Glue Gun

  • Wax Paper

  • Dish Detergent

  • Ornament Template

  • Glitter (My FAVORITE supply!)

  • Mod Podge

  • Small Paint Brush

  • String or Wire
 Step One:

        Google an image you would like to use for your ornament. An image with simple lines that all connect works best. I googled snowflake images and found a nice one to use. Print your image the size you want your ornament to be. (Make sure you don't print a tiny image because you will end up with a blob of hot glue that will look nothing like an ornament.) Get your glue gun, glue sticks, and wax paper ready.


Step Two:

Place a sheet of wax paper over your ornament template. Cover the wax paper with dish detergent. Mix a little water with the detergent to make it spread easily. Then simply trace your image with hot glue. I have found that using a continuous stream of glue with even pressure for each line works best. This is what it will look like when finished.


Step Three:

When the ornament is dry, peel it from the wax paper. If some of the paper sticks to the back, just run the ornament under cold water and peel off the excess paper. This will make the ornament really firm and help get rid of the excess dish detergent. If there are any weak places in the ornament, you can always cover those spots with more glue. I had to do this for my ornament, and that made me decided to make it look more 3D with an extra layer of glue in different spots. Just be sure to let the second layer of glue dry completely before moving your ornament.


Step Four:

Gather your glitter, Mod Podge, and paint brush.


                                  Cover that baby up with a layer of Mod Podge.


COVER WITH GLITTER 


Step Five:

This is the final step! Add a hanger to your ornament. I did this by making a loop from some jewelry wire I had sitting around the apartment. You could use string also. Just hot glue a loop of wire or string to the back of your ornament. Once again, make sure the glue is complete dry before moving your ornament.


With the hanger applied, it's time to admire your hot glue ornament. Here's my finished snowflake.


And there you have it, an easy beautiful christmas snowflake ornament. I hope you have a wonderful Christmas!


Bye Pinners!